欢迎访问 API Testing
API Testing 文档
记录
该项目正在
积极开发中,很多功能尚待补充,我们希望您
参与其中!
API Testing 一个基于 YAML 文件的开源接口测试工具,同时支持运行在本地、服务端。
在选择工具时,可以从很多方面进行考量、对比,以下几点是该工具的特色或者优点:
- 开源与否,atest 采用 MIT 开源协议,是最流行的宽松开源协议之一。有些工具也许有非常丰富的功能、漂亮的界面,但相比于开源项目,免费的工具不定什么时候就有可能变为收费的;而且,你的使用感受几乎很难直接反馈到产品中,只能被动接受。
- 质量、可靠性,作为一款用于测试场景的工具,atest 本身的单元测试覆盖率达 89%,单测代码与业务逻辑代码量平分秋色;另外,每次代码改动都需要通过代码扫描、单元测试等流水线。
- 身材小巧,整个工具大小为 18M,支持 Windows、Linux、macOS 平台。
- 只有简单的可执行二进制文件,不像部分工具会给你的操作系统安装莫名其妙的系统启动项目、系统服务等。
- 基于 YAML 文件,提交到 Git 仓库后,天生支持团队协作,无需注册额外账号。
- 同时提供简单、高级两种模式的返回值断言,还包括 JSON Schema 以及针对 Kubernetes 资源的校验判断。
- 支持性能测试。
- 直接在 VS Code 中直接触发执行单个或整个测试文件。
如何使用?
那么,这个工具长什么样子呢,下面是命令行 atest 的参数说明:
API testing tool

Usage:
  atest [command]

Available Commands:
  completion  Generate the autocompletion script for the specified shell
  help        Help about any command
  json        Print the JSON schema of the test suites struct
  run         Run the test suite
  sample      Generate a sample test case YAML file
  server      Run as a server mode
  service     Install atest as a Linux service

Flags:
  -h, --help   help for atest

Use "atest [command] --help" for more information about a command.
本地模式
执行一个测试用例集文件:atest run -p sample/testsuite-gitlab.yaml,其中的参数 -p 支持模糊匹配多个文件。
如果希望对测试用例集执行性能测试的话,可以增加响应的参数:
atest run -p sample/testsuite-gitlab.yaml --duration 1m --thread 3 --report md
其中的参数 --report 可以指定性能测试输出报告,目前支持 Markdown 以及控制台输出。效果如下所示:
服务端模式
除了本地执行外,atest 还提供了基于 gRPC 协议服务端,通过下面的命令即可启动:
对于 Linux 操作系统,用户还可以通过下面的命令安装后台服务:
atest service (install | start | stop | restart)
当然,如果你对容器、Kubernetes 比较熟悉的话,本项目也提供了对应的支持。
这种模式,对于想要集成的用户而言,可以通过调用 gRPC 来执行测试。也可以安装 VS Code 插件,在编码与接口测试之间无缝切换,您可以搜索 api-testing 找到该插件。
插件会识别所有第一行是 #!api-testing 的 YAML 文件,并提供快速的执行操作,请参考如下截图:
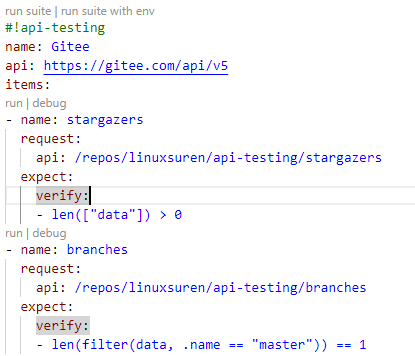
如图所示,会有四个快捷执行操作:
run suite 会执行整个文件run suite with env 会加载 env.yaml 文件并执行整个文件run 执行单个测试用例(包括所依赖的用例)debug 执行单个测试用例,并输出接口返回值
当你安装了 VS Code 插件后,会自动下载并安装 atest 及其服务。当然,你也可以配置不同的远端服务地址。
文件格式
atest 定义的 YAML 格式,基本遵循 HTTP 的语义,熟悉 HTTP 协议的同学即可快速上手。下面是一个范例,更多例子请参考这里:
#!api-testing
name: Kubernetes
api: https://192.168.123.121:6443
items:
- name: pods
  request:
    api: /api/v1/namespaces/kube-system/pods
    header:
      Authorization: Bearer token
  expect:
    verify:
    - pod("kube-system", "kube-ovn-cni-55bz9").Exist()
    - k8s("deployments", "kube-system", "coredns").Exist()
    - k8s("deployments", "kube-system", "coredns").ExpectField(2, "spec", "replicas")
    - k8s({"kind":"virtualmachines","group":"kubevirt.io"}, "vm-test", "vm-win10-dkkhl").Exist()
用户可以自定义请求的 Header、Payload 等,可以对响应体做全面的断言判断。
后续计划
如果您已经耐心阅读到这里的话,可以再顺便了解下这个项目后续的一些想法。
通过更多的实际场景来打磨、优化 atest 对接口测试的便利性、可扩展性,以不丢失易用性为前提增强功能。例如:
- 优化错误提示、反馈
- 提供与 CICD 集成的最佳实践
- 增加 gRPC 等协议的支持
- 增加测试记录信息的持久化
- VS Code 插件支持测试用例编写的提示、格式校验
- 提供插件机制,增加对数据库等数据源的格式校验
最后期待您的反馈 https://github.com/LinuxSuRen/api-testing/issues
准备好开始了吗?
1 - 安装
本节包含关于安装 API Testing 的内容。
atest 支持如下的安装使用场景:
1.2 - Helm
通过 Helm 安装的方式使用 API Testing
You could install api-testing via Helm chart:
helm install atest oci://docker.io/linuxsuren/api-testing \
    --version v0.0.2-helm \
    --set service.type=NodePort
or upgrade it:
helm upgrade atest oci://docker.io/surenpi/api-testing \
    --version v0.0.2-helm \
    --set image.tag=master \
    --set replicaCount=3
SkyWalking
helm install atest oci://docker.io/linuxsuren/api-testing \
    --version v0.0.2-helm \
    --set image.tag=master \
    --set service.type=NodePort \
    --set service.nodePort=30154 \
    --set skywalking.endpoint.http=http://skywalking-skywalking-helm-oap.skywalking.svc:12800 \
    --set skywalking.endpoint.grpc=skywalking-skywalking-helm-oap.skywalking.svc:11800
2.1 - 快速入门
只需几个简单的步骤即可开始使用 API Testing。
本指南将帮助您通过几个简单的步骤开始使用 API Testing。
执行部分测试用例
下面的命令会执行名称中包含 sbom 的所有测试用例:
atest run -p test-suite.yaml --case-filter sbom
2.2 - 关于安全
通常在不使用 TLS 证书认证时,gRPC 客户端与服务端之间进行的是明文通信,信息易被第三方监听或篡改。所以大多数情况下均推荐使用 SSL/TLS 保护 gRPC 服务。目前atest已实现服务端 TLS,双向 TLS(mTLS) 需等待后续实现。
默认情况下atest不使用任何安全策略,等价于spec.secure.insecure = true。启用 TLS 仅需 yaml 中添加以下内容:
spec:
  secure:
    cert: server.pem
    serverName: atest
字段说明
secure共有以下五个字段:
| 字段名 | 类型 | 是否可选 |
|---|
| cert | string | x |
| ca | string | √ |
| key | string | √ |
| serverName | string | x |
| insecure | bool | √ |
cert为客户端需要配置的证书的文件路径,格式为PEM。
serverName为 TLS 所需的服务名,通常为签发证书时使用的 x509 SAN。
ca为 CA 证书的路径,key为与cert对应的私钥,这两项填写后代表启用 mTLS。(mTLS 尚未实现)
当insecure为false时,cert和serverName为必填项。
2.3 - 用例模板
atest 采用 sprig 作为测试用例的模板引擎。通过模板函数可以生成很多随机数据:
手机号
下面的代码可以生成 182 开头的手机号:
182{{shuffle "09876543"}}
带权重的随机枚举
下面的代码以 80% 的概率返回 open,以 20% 的概率返回 closed:
{{randWeightEnum (weightObject 4 "open") (weightObject 1 "closed")}}
时间
下面的代码可以生成当前时间,并制定时间格式:
{{ now.Format "2006-01-02T15:04:05Z07:00" }}
如果想要获取其他时间,则可以参考如下写法:
{{(now | date_modify "2h") | date "2006-01-02T15:04:05"}}
环境变量
下面的代码可以获取环境变量 SHELL 的值,在需要使用一个全局变量的时候,可以使用这个模板函数:
{{ env "SHELL" }}
2.4 - 任务
在特定情况下,执行接口测试用例前需要执行相应的任务,例如:数据初始化、等待服务就绪等等。 atest 的任务功能,就是为了满足这类场景而设计的。
任务的执行引擎为 expr,如果当前页面给出的示例无法满足你的需求,可以查阅相关的官方文档。
等待接口响应码为 200
以下的例子会每隔一秒请求一次指定的接口,并检查响应码(Status Code)是否为 200,如果不是的话,则最多会重试 3 次:
name: demo
api: http://localhost
items:
  - name: login
    before:
      items:
        - httpReady("http://localhost/health", 3)
    request:
      api: /demo
如果希望检查响应体的话,则可以用下面的表达式:
httpReady("http://localhost:17001/actuator/health", 3, 'components.discoveryComposite.components.eureka.details.applications["AUTH"] == 1')
2.5 - 测试用例验证
atest 采用 https://expr.medv.io 对 HTTP 请求响应的验证,比如:返回的数据列表长度验证、具体值的验证等等。下面给出一些例子:
需要注意的是,data 指的是 HTTP Response Body(响应体)的 JSON 对象。
数组长度判断
  - name: projectKinds
    request:
      api: /api/resources/projectKinds
    expect:
      verify:
        - len(data.data)  == 6
数组值检查
检查数组中是否有元素的字段包含特定值
示例数据:
{
  "data": [{
    "key": "Content-Type"
  }]
}
校验配置:
- name: popularHeaders
  request:
    api: /popularHeaders
  expect:
    verify:
      - any(data.data, {.key == "Content-Type"})
检查数组中是否有元素的字段只包含特定值
校验配置:
- name: popularHeaders
  request:
    api: /popularHeaders
  expect:
    verify:
      - all(data.data, {.key == "Content-Type" or .key == "Target"})
更多用法.
字符串判断
- name: metrics
  request:
    api: |
      {{.param.server}}/metrics
  expect:
    verify:
      - indexOf(data, "atest_execution_count") != -1
更多用法.
2.6 - End-to-End
atest 非常适合针对(HTTP)接口做 E2E(端到端)测试,E2E 测试可以确保后端接口在完整的环境中持续地保持正确运行。下面采用 Docker compose 给出一个使用事例:
version: '3.1'
services:
  testing:
    image: ghcr.io/linuxsuren/api-testing:latest
    environment:
      SERVER: http://server:8080
    volumes:
      - ./testsuite.yaml:/work/testsuite.yaml
    command: atest run -p /work/testsuite.yaml
    depends_on:
      server:
        condition: service_healthy
    links:
      - server
  server:
    image: ghcr.io/devops-ws/learn-springboot:master
    healthcheck:
      test: ["CMD", "bash", "-c", "cat < /dev/null > /dev/tcp/127.0.0.1/8080"]
      interval: 3s
      timeout: 60s
      retries: 10
      start_period: 3s
从 Docker compose v2.36.0 开始,可以采用如下简化的写法:
services:
  testing:
    scale: 0
    provider:
      type: atest
      options:
        pattern: testsuite.yaml
    environment:
      SERVER: http://server:8080
    depends_on:
      server:
        condition: service_healthy
    links:
      - server
  server:
    image: ghcr.io/devops-ws/learn-springboot:master
    healthcheck:
      test: ["CMD", "bash", "-c", "cat < /dev/null > /dev/tcp/127.0.0.1/8080"]
      interval: 3s
      timeout: 60s
      retries: 10
      start_period: 3s
2.7 - Mock 服务
Mock 服务在前后端并行开发、系统对接、设备对接场景下能起到非常好的作用,可以极大地降低团队之间、系统之间的耦合度。
用户可以通过命令行终端(CLI)、Web UI 的方式来使用 Mock 服务。
命令行
atest mock --prefix / --port 9090 mock.yaml
Web
在 UI 上可以实现和命令行相同的功能,并可以通过页面编辑的方式修改、加载 Mock 服务配置。
Mock Docker Registry
您可以通过执行下面的命令 mock 一个容器仓库服务container registry:
atest mock --prefix / mock/image-registry.yaml
之后,您可以通过使用如下的命令使用 mock 功能。
docker pull localhost:6060/repo/name:tag
语法
从整体上来看,我们的写法和 HTTP 的名称基本保持一致,用户无需再了解额外的名词。此外,提供两种描述 Mock 服务的方式:
面向对象
#!api-testing-mock
# yaml-language-server: $schema=https://linuxsuren.github.io/api-testing/api-testing-mock-schema.json
objects:
  - name: projects
    initCount: 3
    sample: |
      {
        "name": "atest",
        "color": "{{ randEnum "blue" "read" "pink" }}"
      }
上面 projects 的配置,会自动提供该对象的 CRUD(创建、查找、更新、删除)的 API,你可以通过 atest 或类似工具发出 HTTP 请求。例如:
curl http://localhost:6060/mock/projects

curl http://localhost:6060/mock/projects/atest

curl http://localhost:6060/mock/projects -X POST -d '{"name": "new"}'

curl http://localhost:6060/mock/projects -X PUT -d '{"name": "new", "remark": "this is a project"}'

curl http://localhost:6060/mock/projects/atest -X DELETE
initCount 是指按照 sample 给定的数据初始化多少个对象;如果没有指定的话,则默认值为 1.
自定义
#!api-testing-mock
# yaml-language-server: $schema=https://linuxsuren.github.io/api-testing/api-testing-mock-schema.json
items:
  - name: prList
    request:
      path: /api/v1/repos/{repo}/prs
    response:
      header:
        server: mock
        Content-Type: application/json
      body: |
        {
          "count": 1,
          "repo": "{{.Param.repo}}",
          "items": [{
            "title": "fix: there is a bug on page {{ randEnum "one", "two" }}",
            "number": 123,
            "message": "{{.Response.Header.server}}",
            "author": "someone",
            "status": "success"
          }]
        }
启动 Mock 服务后,我们就可以发起如下的请求:
curl http://localhost:6060/mock/api/v1/repos/atest/prs -v
另外,为了满足复杂的场景,还可以对 Response Body 做特定的解码,目前支持:base64、url:
#!api-testing-mock
# yaml-language-server: $schema=https://linuxsuren.github.io/api-testing/api-testing-mock-schema.json
items:
  - name: base64
    request:
      path: /api/v1/base64
    response:
      body: aGVsbG8=
      encoder: base64
上面 Body 的内容是经过 base64 编码的,这可以用于不希望直接明文显示,或者是图片的场景:
curl http://localhost:6060/mock/api/v1/base64
如果你的 Body 内容可以通过另外一个 HTTP 请求(GET)获得,那么你可以这么写:
#!api-testing-mock
# yaml-language-server: $schema=https://linuxsuren.github.io/api-testing/api-testing-mock-schema.json
items:
  - name: baidu
    request:
      path: /api/v1/baidu
    response:
      body: https://baidu.com
      encoder: url
在实际情况中,往往是向已有系统或平台添加新的 API,此时要 Mock 所有已经存在的 API 就既没必要也需要很多工作量。因此,我们提供了一种简单的方式,即可以增加代理的方式把已有的 API 请求转发到实际的地址,只对新增的 API 进行 Mock 处理。如下所示:
#!api-testing-mock
# yaml-language-server: $schema=https://linuxsuren.github.io/api-testing/api-testing-mock-schema.json
proxies:
  - path: /api/v1/{part}
    target: http://atest.localhost:8080
当我们发起如下的请求时,实际请求的地址为 http://atest.localhost:8080/api/v1/projects
curl http://localhost:6060/mock/api/v1/projects
如何希望把所有的请求都转发到某个地址,则可以使用通配符的方式:
proxies:
  - path: /{path:.*}
    target: http://192.168.123.58:9200
TCP 协议代理
proxies:
  - protocol: tcp
    port: 3306
    path: /
    target: 192.168.123.58:33060
代理多个服务
atest mock-compose bin/compose.yaml
执行上面的命令,会启动多个 Mock 代理服务,分别以不同的端口代理了 Elasticsearch 和 Eureka 服务:
proxies:
  - prefix: /
    port: 9200
    path: /{path:.*}
    target: http://192.168.123.58:9200
  - prefix: /
    port: 17001
    path: /{path:.*}
    target: http://192.168.123.58:17001
  - protocol: tcp
    port: 33060
    path: /
    target: 192.168.123.58:33060
当前代理支持 HTTP 和 TCP 协议,上面的例子中代理了 MySQL 的 33060 端口。
更多 URL 中通配符的用法,请参考 https://github.com/gorilla/mux
2.8 - 代码生成
atest 支持把测试用例生成多种开发语言的代码:
该功能需要在 Web UI 上使用。
2.9 - gRPC测试用例编写指南
本文档将介绍如何编写api-testing的 gRPC API 的测试用例。
阅读本文档之前,您需要先安装并配置好api-testing,具体操作可以参考安装章节。如果您已经完成了这些步骤,可以继续阅读本文档的后续部分。
创建测试项目
创建一个基于服务反射的 gRPC 测试用例仅需在 yaml 文件的spec路径下加入以下内容:
spec:
  rpc:
    serverReflection: true
rpc字段一共有五个子字段
| 字段名 | 类型 | 是否可选 |
|---|
| import | []string | √ |
| protofile | string | √ |
| protoset | string | √ |
| serverReflection | bool | √ |
字段import和protofile
protofile是一个文件路径,指向api-testing查找描述符的.proto文件的位置。
import字段与protc编译器中的--import_path参数类似,用于确定查找proto文件的位置与解析依赖的目录。与protoc一样,您不需要在此处指定某些proto文件的位置(以google.protobuf开头的Protocol Buffers Well-Known Types),它们已经内置在了api-testing中。
字段protoset
protoset字段既可以是一个文件路径,也可以是http(s)://开头的网络地址。
当您的proto数量繁多或引用关系复杂,可以尝试使用protoc --descriptor_set_out=set.pb生成proto描述符集合。本质上它是一个使用了wire编码的二进制文件,其中包括了所有需要的描述符。
字段serverReflection
若目标服务器支持服务反射,将此项设为true则不再需要提供上述三个字段。
注:api-testing对三种描述符来源的优先级顺序为
serverReflection > protoset > protofile
编写gRPC API测试
与编写HTTP测试用例类型,您需要在根节点的api字段定义服务器的地址。
默认情况下api-testing使用不安全的方式连接到目标服务器。若您想配置TLS证书,请参考文档关于安全
编写gRPC API测试的方式与编写HTTP API测试的方式基本相同。
- name: FunctionsQuery
  request:
    api: /server.Runner/FunctionsQuery
    body: |
      {
        "name": "hello"
      }
  expect:
    body: |
      {
        "data": [
          {
            "key": "hello",
            "value": "func() string"
          }
        ]
      }
api字段的格式为/package.service/method,支持 gRPC 一元调用、客户端流、服务端流和双向流调用。
与api字段同级的body字段是以JSON格式表示的Protocol Buffers消息,代表将要调用的api的入参。特别的,当您需要调用客户端流或双向流 API 时,请使用JSON Array格式编写字段body,如:
body: |
  [
    {
      "name": "hello"
    },
    {
      "name": "title"
    }
  ]
编写返回内容验证
编写gRPC API返回内容验证的方式与HTTP API基本相同。对与gRPC API来说,一切返回值都被视为map类型,被放入api testing特定的返回结构中:
expect:
  body: |
    {
      "data": [
        {
          "key": "hello",
          "value": "func() string"
        }
      ]
    }
api-testing为JSON比对编写了一套对比库,请参考此处compare
请注意,对于服务端流和双向流模式,服务器发送多条消息的情况下,此处的data字段内的填写的目标数组,需同时满足与待验证数组长度相,两个数组同一下标的内容完全相同。
gRPC API 的 verify 功能与 HTTP API 保持一致,此处不再赘述。
2.10 - gRPC TLS verification
If you want to enable gRPC TLS, you need to generate your certificates in the workspace, or you can use an absolute path
1. 生成私钥
openssl genrsa -out server.key 2048
2. 生成证书(会提示即可,不必填写)
openssl req -new -x509 -key server.key -out server.crt -days 36500
国家名字
Country Name (2 letter code) [AU]:CN
省份全名
State or Province Name (full name) [Some-State]:GuangDong
城市名
Locality Name (eg, city) []:Meizhou
组织名
Organization Name (eg, company) [Internet Widgits Pty Ltd]:Xuexiangban
组织单位名
Organizational Unit Name (eg, section) []:go
服务器or用户的名字
Common Name (e.g. server FQDN or YOUR name) []:kuangstudy
邮箱地址
Email Address []:24736743@qq.com
3.生成csr
openssl req -new -key server.key -out server.csr
4.配置openssl.cfg
1) 查找openssl在服务器的安装目录并且找到openssl.cnf
2) 编辑[ CA_default ] ,打开 copy_extensions = copy #取消注释
3) 找到[ req ],打开 req_extensions = v3.req #取消注释
4) 找到[ v3_req ],添加字段 subjectAltName = @alt_names
5) 添加新的标签在最底部 [ alt_names ]和标签字段
DNS.1 = localhost
5.生成本地私钥test.key
openssl genpkey -algorithm RSA -out test.key
6.根据私钥生成csr请求文件test.csr
openssl req -new -nodes -key test.key -out test.csr -days 3650 \
-subj "/C=US/ST=Denial/L=Springfield/O=Dis/CN=www.example.com" \
-config ./openssl.cnf -extensions v3_req
7.生成ca证书 pem
openssl x509 -req -days 365 -in test.csr \
-out test.pem -CA server.crt -CAkey server.key \
-CAcreateserial -extfile ./openssl.cnf -extensions v3_req
2.11 - 插件
atest 会把非核心、可扩展的功能以插件(extension)的形式实现。下面介绍有哪些插件,以及如何使用:
在不同的系统中,插件有着不同的表述,例如:extension、plugin 等。
atest 也是唯一支持如此丰富的存储的接口开发、测试的开源工具。
下载插件
我们建议通过如下的命令来下载插件:
上面的命令,会识别当前的操作系统,自动下载最新版本的插件。当然,用户可以通过自行编译、手动下载的方式获取插件二进制文件。
atest 可以从任意支持 OCI 的镜像仓库中(命令参数说明中给出了支持的镜像服务地址)下载插件,也可以指定下载超时时间:
atest extension orm --registry ghcr.io --timeout 2ms
想要下载其他类型的插件的话,可以使用下面的命令:
atest extension --kind data swagger
3 - API
本节内容包含 API Testing 的 API。
